If you’re wondering, we’ve decided to pull out the section about formatting your ebook from the Publishing on Amazon: A Step-by-Step Guide post and put it into its own post! This is mainly because it really is a post on its own, due to the length of it, and it was making the uploading steps a little too confusing.
Also, new update! As of recently (well, we don’t remember when, but at least end of last year), you can now upload a pre-formatted e-pub if you have one. So, if you’re already getting someone to create an e-pub file for you to use on Google Play or E-Sentral, now you can just use that same file here too!
Here’s also how you can create your own e-pub file via Scrivener.
Formatting your ebook via Microsoft Word
Got your manuscript ready? Great!
We’re using Microsoft Word in this sample because it’s the most common software. You can use any other text processors, of course, but you’ll need to save it in a .docx file for uploading.
A) Add in your front matter


This is all the stuff you usually find in the front of a book: title page, publisher, year published, license notes, etc.
You can create something fancy and elaborate like the stuff in a paperback. The simplified version shown here was adapted from the Smashwords guide and has worked for the past few years, so it’s an easy option.
B) Format your body/text: use a standard setting

Remember that you’re formatting for ebook, so whatever fancy stuff you do, it’s 90% going to be overridden by the reader’s Kindle settings. I use a standard 12 point Times New Roman with a 0.3” first-line indent with 0 line spacing and no spaces before/after paragraphs. This gives you a nice tight look.
C) Format your chapter headings: use headers

Format your chapter headings using a “headings” style as this simplifies the process of getting your Table of Contents up. I assure you this is 100% easier than Smashwords, so be grateful! Just set your chapter title (in this series, we use roman numerals, but your chapter headings could be anything you want) to the Heading 1 style and make any stylistic adjustments you wish (we centre & bold the text and change the font to Times New Roman) then copy the format to all your chapter headings.
D) Formatting chapter breaks: use page breaks

Use the page break function to separate your chapters (shortcut: ctrl+Enter). DON’T use multiple paragraph breaks! Multiple paragraphs will probably not be read/recognised by Kindle so all your chapters will appear mushed up into one super long chapter instead of starting on a new page/section each time.
E) Add in your back matter
Your back matter will likely expand over time as you publish more books. You’re publishing more books, right?

We like to leave a little reminder for the reader to leave a review, but this isn’t necessary.

As a first-time author, the very basic you need is an “About the Author” section where you can link your webpage or other social media that you want to direct readers to.

Once you’ve built a backlist, you can add them into your back matter so that if readers like your book, they can go and look for other stuff you’ve written.
Don’t forget to format the headings of your front and back matter as “Heading 1” too!
F) Create a Table of Contents (TOC)

Now that you have everything in place, it’s time to set up your Table of Contents. Go to Reference>>Table of Contents>>Custom Table of Contents.

Untick “show page numbers” because page numbers are irrelevant to ebooks. Once it’s in the Kindle, the page numbers will change according to the reader’s settings. What you DO want is for the TOC to be clickable (hyperlinked) so that they can jump ahead to chapters if they wish.

Make sure that everything you want to appear on the TOC appears—if they don’t, you’ll have to check that you’ve formatted all the chapter titles/headings as “Heading 1”.
Additional reading: https://kdp.amazon.com/en_US/help/topic/G200645680
Formatting ebooks on Kindle Create
Okay, so Kindle has this snazzy new Kindle Create (KC) program, so we tested it out for this demo.
Note: We deleted the TOC for this demo as it seems that this is where the formatting steps diverge.

Right. You’ve got your manuscript ready and you’ve done all the steps from A to E above. Now you open Kindle Create, select Novels, Essays, Poetry, Narrative Non-fiction. (Unless, of course, your book is one of the others, in which case this guide isn’t for you).
Choose the file. Upload the manuscript. It asked if we wanted to do a bunch of stuff, which was obviously yes.

Awesome. KC found all our headings and created a TOC! It doesn’t appear to be inserted in the text though, unlike the Word document.

Hmmm with these clickable format buttons, we’re able to define a copyright page, splitting it off from the Title Page. Looks alright…

We didn’t format mid-chapter separators in the Word file but Kindle Create has a standard separator format. If you missed any chapter titles or quotes in your Word Document, you can use this to define them too. Nice.

Ooh, Drop Caps. It looks like A Still, Small Voice might feature drop caps just because of this function. Ha. We didn’t test the “poetry” function because this ebook doesn’t have any.

Autosave reminders. Good job.

This pic was already in the word format and this is how it appears when converted over.

We tried reuploaded this picture to see how it works. KC only accepts pics in jpg.

KC has a handy previewer, so you can see what it actually looks like on a (mock) Kindle.

Oooooo themes! Not really necessary, but fun. Also, this is where you get a prettier ebook than just formatting in Word, I guess.

When you click publish, Kindle Create saves a separate file (.kpf) to upload on the site, same as if you upload the Word doc.
Verdict: Not really necessary, but it’s easy enough to use. And kinda pretty.
So does that mean I have a formatted ebook for Amazon now?
If you followed the Microsoft Word steps, you’ll have a formatted Word Document (.docx) that you can upload to Amazon.
If you used Kindle Create, you’ll have a KC file (.kpf) that you can upload to Amazon.
Head back to Step 10 of the Publishing on Amazon: Step-by-Step Guide to see how to upload it.
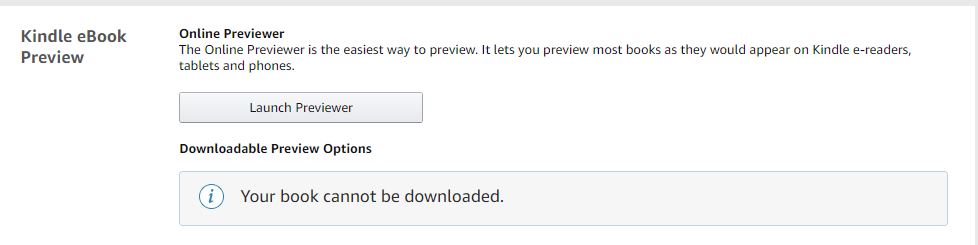
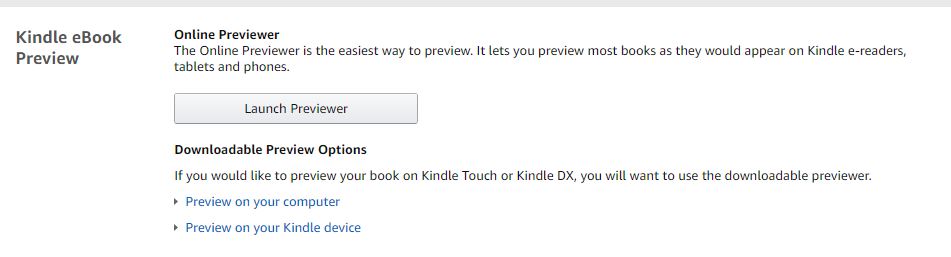
One thing to note: if you create your ebook via Kindle Create, you will not be able to download a preview file that you can send to reviewers. All you’ll have is the .kpf file that can only be read on Kindle Previewer. However, if you use a Word Doc or an epub to upload to Amazon, you’ll be able to get a .mobi file to review that you can send to reviewers.


 We covered how to publish your ebook on Amazon KDP in detail in


 Publishing on Amazon is really easy. Promise. Here’s a step-by-step guide to help you do just that. Feel free to skip points that are obvious to you and jump to items you’re not sure about. And if you have any questions, just ask!