Home » formatting

Tag: formatting

Publishing on Draft2Digital: A Step-by-Step Guide

Publishing on Draft2Digital: A Step-by-Step Guide

What is Draft2Digital, or D2D?

As we mentioned in this post, D2D is an aggregator—or what you might call an e-book distributor. It serves as a central hub where you upload your ebook and then that ebook gets sent out to a bunch of e-book retailers. In this case, D2D can help you get your books on Amazon, Barnes & Noble, Kobo, and Apple, plus library and subscription services such as OverDrive and Scribd.

Draft2Digital acquired Smashwords recently so everything is going to be streamlined in the near future. We don’t know all the details of how the accounts (if you have accounts on both) are going to merge, but it’s something we’re keeping an eye on for new developments.

While we’re waiting for that, here’s a quick step-by-step guide on how to publish your lovely new ebook on D2D and have it EVERYWHERE ONLINE!

But first…


Draft2Digital Formatting tips

One of the reasons we’ve prefered D2D over Smashwords is because formatting your ebook is so much easier (and prettier) using their inbuilt templates and automation. It’s almost 90% less work than formatting for meatgrinder on Smashwords. But as usual, you still need to keep some minor formatting rules in place to get it to do what you want. Here are the basics.

  1. Make sure all your chapter titles are formatted the same way. As long as it’s consistent (for example, all titles are in bold & capslock or something like that or using Header styles), Draft2Digital will assume that’s the chapter title. You don’t have to manually insert a Contents page.
  2. If you use scene breaks, you’ll want to leave 3 blank lines, something like this:
    Example of scene break, showing 3 paragraph lines between textDraft2Digital will convert this into a scene break. Depending on the template, it’ll have a pretty little icon there (which changes based on the theme you select), something like this:
  3. Insert a page break at the end of your chapter; though this usually isn’t very important. If you leave a bunch of empty lines (i.e. more than three lines) followed by a chapter title, Draft2Digital will convert that into a page break anyway.
  4. Copyright page: Draft2Digital has a standard copyright page which is really barebones, so you can leave that off your document and let D2D do its thing. However, if you want to control what the copyright page says, add one at the beginning of your manuscript.
  5. End matter: These can be auto-added by Draft2Digital once you fill up your profile. However, if you have other books that are not published via Draft2Digital, you’ll need to manually add book pages to the end of your manuscript.

But okay, enough about formatting.


Here’s how you upload your manuscript to Draft2Digital

Right on your dashboard, click the big red button that says:

Add New Book button


Ebook setup: cover & metadata

Pretty self-explanatory. If you have your ebook cover ready, put it here. If you don’t yet, leave it blank. You can upload it later. But if you’re planning to publish like now, now, then you NEED to have this ready.

Then you have to fill in a bunch of basic info. If you’ve uploaded books on Amazon, Smashwords, e-Sentral or Google Play before, this is basically all the same info.

If you’re at this stage of publishing, you should already know your book title and what language you’re writing in. Though, titles are tricky.

For this one, it’s part of the Absolution Series, so we’ve put that under “Series” and we have Volume Number 1.5.

Okay, 1.5 is a weird number, but this book kind of sits in a timeline between the main two books of the series, but isn’t actually part of the overarching plot of the duology. Hence, 1.5 because it’s a sidetrack.

If your book is a stand-alone, you can leave both of these fields blank.

“Prioritized search terms” is how you want people to find your book. So since Hostage Prince is a fantasy story set in Southeast Asia, we’ve put that in for now, while we figure out what else works. Put your most important search terms at the top because if the vendor/retailer has a limited amount of search terms, they’ll only take the top few.

ETA: Don’t forget to press enter after keying in your search terms in the box! You can do that after each individual term, or you can do that after you key in a bunch of terms separated by either a comma or a semi-colon. This sends what you’ve entered into the Prioritized Search Terms box and then you can drag and drop them in the sequence you prefer.


“BISACS” (Book Industry Standards and Communications) is where they are going to try to categorise your books, something like deciding which specific niche genre it’s in. Amok was placed under Young Adult/Fantasy and Absolution will definitely fall under that too, but Hostage Prince is slightly above YA because Yosua is 20 at the start of this book, and it’s not quite coming-of-age. It’s more Yosua’s pining, faith story with lots of murder and blood, so we’re going to try sticking this in Fiction/Fantasy/Action & Adventure (you can’t have Fiction & YA Fiction at the same time) and maybe see if it’ll cross over into the Christian/Fantasy lists.

You can choose up to 5 but the top two are the most important.

Then you click

Start Ebook button


Ebook Details

This is where you upload your manuscript in doc, docx, rtf, or epub format to Draft2Digital.

If you already have a nice epub you really want to use, and you don’t want to utilise Draft2Digital’s autogenerated front and back matter, then just upload the epub.

If you intend to use their autogenerated stuff, stick with the Word document.

The page is currently reminding us that we have not yet uploaded a cover. Clicking on the “Edit shared metadata and cover” link is where you can go back and make changes to everything that appeared on the ebook setup page. If you’re setting up a pre-order, enter your targetted pre-order date. If you’re publishing now, well, just choose today.

“Ebook Description” is basically your back cover copy of the print book (if you have one), or what appears on the sales page on, say Amazon. It tells people what your book is about.

The next two sections are optional but are great if your book is a collaboration, or you want to credit a lot of different people who have worked on your book.

If, for example, you are co-authoring a book with someone else, Draft2Digital lets you split your royalties.

You can also credit other people on the book, like your cover designer!

E-ISBN

Draft2Digital requires an e-ISBN, but since we uploaded this while on preorder and had not yet applied for an ISBN, we just added a placeholder number first.

WARNING!!!! If you do this, make sure you remember to update this to your ACTUAL e-ISBN BEFORE you authorise your ebook for publication! Once it’s published, you can’t change this anymore. Then if errors appear, you’re going to have to unpublish and delete the whole ebook and start the publishing process again.

There’s an option to use free Draft2Digital-provided e-ISBNs (so you don’t have to apply for your own), but we disabled this on our account since we apply for all our e-ISBNS anyway. (Yay free e-ISBN from PNM!)

Okay, so done?

Save and Continue button


Ebook Layout

Here’s where we get to the fancy stuff!

Remember we said you don’t need to insert a manual Table of Contents?
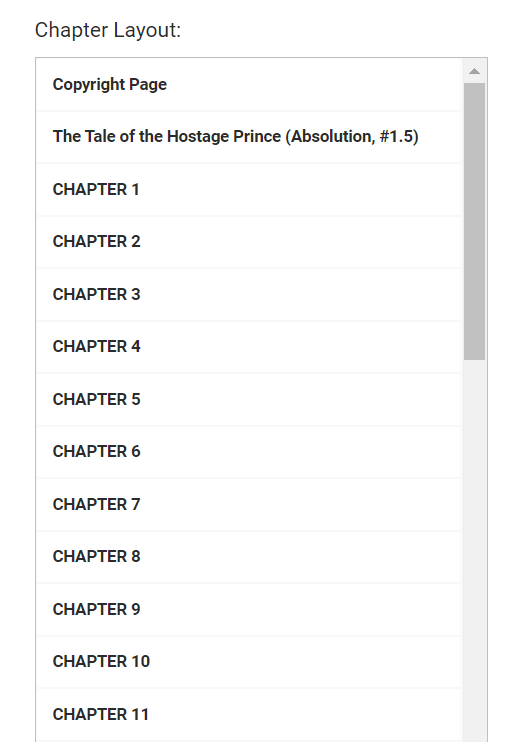
autogenerated Table of Contents


Yup, Draft2Digital generates one for you based on your document headers. If something doesn’t look right, click on

Help! These aren't my chapters! button

This will take you to an “Improper Chapter Detection” page, where you can select which formatting in your manuscript denotes a chapter title.

If that’s too much trouble—or you realised that you never really set any headers for your chapter titles, just go back and make all your chapter titles consistent then reupload the manuscript. Just using Word’s generic header styles will work fine.

Once your chapter titles have been fixed, you can add start adding all the extra front and back matter.

Front Matter

Introductory Pages: Title Page, Copyright Page, Dedication

We’re adding a title page because we didn’t include one in the manuscript. We already have copyright & dedication pages included in the manuscript, so we don’t need to select those.

Back Matter

Promotional Pages: Also By, New Release Email Notifications Signup, and Teaser

If you’ve already published other ebooks through Draft2Digital, you can add them to your book (options are beginning/end/both) so that readers can see what else you’ve written and click on the links to buy them.

There’s also a new release signup, kind of like a “follow author” option, so that the next time you release a book in Draft2Digital, they’ll get an email about it.

The Teaser option will put a brief blurb about your other books at the end of your ebook. We’re guessing that people who read Hostage Prince would probably have read Amok, but you never know! Sometimes people read out of order, since this isn’t a strict sequel anyways, so this includes a short preview of Amok.

Biographical Pages: About the Author, About the Publisher

Biographical Pages is where you add your profile and your company’s profile (if you have one). This info is set up when you create your account (under Account Settings) so we’ll probably stick that bit in another post.

Now,

Save and Continue button


Preview time!

Preview of ebook

Draft2Digital lets you preview the converted ebook directly on the web, but the viewer can sometimes be a little wonky. We usually like to download the mobi & epub copies to have a closer look.

But before you do that, choose your template style!

We previously used Science Fiction & Fantasy > Regal for Amok, but we’re going with All Purpose > Maraschino for this one.

Template sample - Maraschino, using phrase caps for chapter and scene decoration.

You can also set if you want to start your chapters and scenes (after a scene break) with Drop Cap (the first letter is really huge), Phrase Cap (the first line is in capitals), or None (no fancy stuff needed).

Okay, so now you can download the stuff and go review your ebook!

Download your book preview: Mobi, epub, PDF

Basically, at this point, you can keep revising stuff until you’re happy with how the book looks. Reviewing and revising might take a while, but don’t worry. It’s all saved in the system and you can always come back to look for your draft on your dashboard:

My Books dashboard


Release the Kraken!

Right, you’ve reviewed it a million times, updated for typos, found the best theme/style, updated your cover, screamed at your cover, changed the theme again, updated your metadata, updated your eISBN…and now you’re ready to publish!

Remember that this is your last chance to put in the right eISBN (if you’re stupid enough to use a placeholder like us). Because if it’s wrong, you have to delete this whole thing and start again.

Select: i have reviewed this manuscript and approve it for release for distribution to any sales channels I select on the next step.

Alright!

So once you’ve approved your book for release, you get to the publishing page where you get to pick your price and where you want to sell your ebooks.


Ebook Publish

Here’s where you put in your retail price and select where you want your book to be sold. You’ll want to put the full price here because sales or promotional prices can be set on another page.

List of digital stores: Barnes and Noble, Kobo, Apple, Tolino, Vivlio Amazon, Subscription Services, Kobo Plus

We don’t select Amazon distribution via Draft2Digital because we DO have a KDP account where we upload our ebooks directly. Selecting it here plus uploading there would create a conflict and might get not just the ebooks pulled from Amazon but the account closed/banned as well. If you don’t have a KDP account and have no intention of opening a new one, select this so that your ebook is distributed to Amazon. There will be a bunch of things to confirm before they actually distribute to Amazon, though.

Library pricing
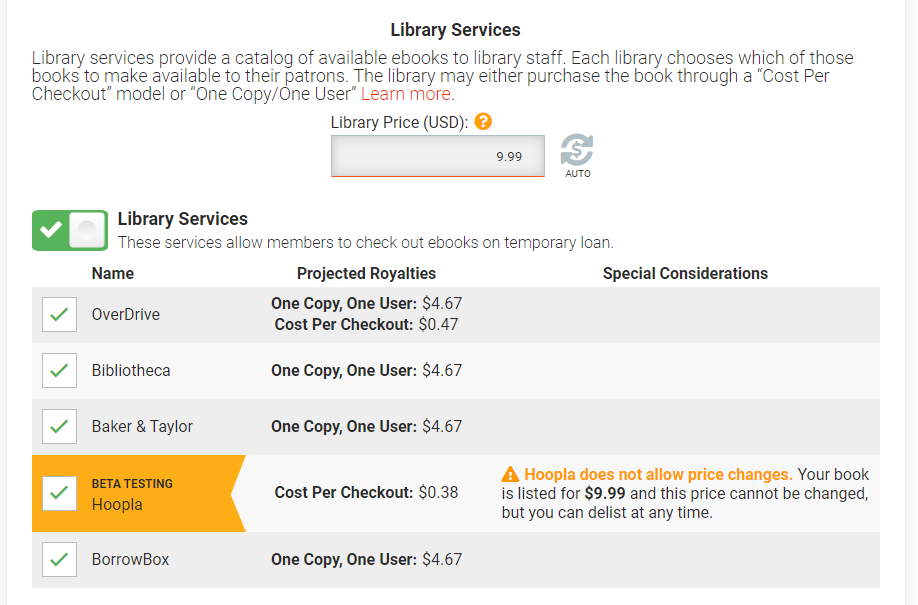
Library Services: OverDrive, Bibliotheca, Baker & Taylor, Hoopla, BorrowBox

The pricing for this is a little confusing, so we usually just use the “auto” price so that Draft2Digital selects the best price based on our selling price.

Then you get to click publish!

Phew! (Break time)


Your book page


This book page is where you’ll be able to update or edit things later on. It’s also where you can add a print book (we’re currently using IngramSpark and Amazon KDP’s POD) or an audiobook.

D2D Print beta - sign up for more info

The Draft2Digital Print Beta runs on a waiting list so you may not be able to use it right away.

What if I wanna run a sale?

Well, that’s where the handy “promotion” button comes in! We used this to set up our pre-order price.

Promotion Details - schedule a promotional price

This page tells you your current price and the expected royalties you’ll get at that price. You can set a promotional/sales price to run on certain dates and they’ll tell you how much royalties you’ll get from sales at that promo price. You can also set promotions to run only in specific territories if you’re targeting some kind of country-specific celebration.


Aaaaanddd that’s pretty much everything you need to know about uploading a book on Draft2Digital for now.

Publishing on Amazon: Formatting your ebook

Publishing on Amazon: Formatting your ebook

If you’re wondering, we’ve decided to pull out the section about formatting your ebook from the Publishing on Amazon: A Step-by-Step Guide post and put it into its own post! This is mainly because it really is a post on its own, due to the length of it, and it was making the uploading steps a little too confusing.

Also, new update! As of recently (well, we don’t remember when, but at least end of last year), you can now upload a pre-formatted e-pub if you have one. So, if you’re already getting someone to create an e-pub file for you to use on Google Play or E-Sentral, now you can just use that same file here too!

Here’s also how you can create your own e-pub file via Scrivener.


Formatting your ebook via Microsoft  Word

Got your manuscript ready? Great!

We’re using Microsoft Word in this sample because it’s the most common software. You can use any other text processors, of course, but you’ll need to save it in a .docx file for uploading.

A) Add in your front matter

 
This is all the stuff you usually find in the front of a book: title page, publisher, year published, license notes, etc.

You can create something fancy and elaborate like the stuff in a paperback. The simplified version shown here was adapted from the Smashwords guide and has worked for the past few years, so it’s an easy option.


B) Format your body/text: use a standard setting


Remember that you’re formatting for ebook, so whatever fancy stuff you do, it’s 90% going to be overridden by the reader’s Kindle settings. I use a standard 12 point Times New Roman with a 0.3” first-line indent with 0 line spacing and no spaces before/after paragraphs. This gives you a nice tight look.


C) Format your chapter headings: use headers


Format your chapter headings using a “headings” style as this simplifies the process of getting your Table of Contents up. I assure you this is 100% easier than Smashwords, so be grateful! Just set your chapter title (in this series, we use roman numerals, but your chapter headings could be anything you want) to the Heading 1 style and make any stylistic adjustments you wish (we centre & bold the text and change the font to Times New Roman) then copy the format to all your chapter headings.


D) Formatting chapter breaks: use page breaks


Use the page break function to separate your chapters (shortcut: ctrl+Enter). DON’T use multiple paragraph breaks! Multiple paragraphs will probably not be read/recognised by Kindle so all your chapters will appear mushed up into one super long chapter instead of starting on a new page/section each time.


E) Add in your back matter

Your back matter will likely expand over time as you publish more books. You’re publishing more books, right?


We like to leave a little reminder for the reader to leave a review, but this isn’t necessary.

As a first-time author, the very basic you need is an “About the Author” section where you can link your webpage or other social media that you want to direct readers to.

Once you’ve built a backlist, you can add them into your back matter so that if readers like your book, they can go and look for other stuff you’ve written.

Don’t forget to format the headings of your front and back matter as “Heading 1” too!


F) Create a Table of Contents (TOC)


Now that you have everything in place, it’s time to set up your Table of Contents. Go to Reference>>Table of Contents>>Custom Table of Contents.

Untick “show page numbers” because page numbers are irrelevant to ebooks. Once it’s in the Kindle, the page numbers will change according to the reader’s settings. What you DO want is for the TOC to be clickable (hyperlinked) so that they can jump ahead to chapters if they wish.

Make sure that everything you want to appear on the TOC appears—if they don’t, you’ll have to check that you’ve formatted all the chapter titles/headings as “Heading 1”.

Additional reading: https://kdp.amazon.com/en_US/help/topic/G200645680


Formatting ebooks on Kindle Create

Okay, so Kindle has this snazzy new Kindle Create (KC) program, so we tested it out for this demo.

Note: We deleted the TOC for this demo as it seems that this is where the formatting steps diverge.


Right. You’ve got your manuscript ready and you’ve done all the steps from A to E above. Now you open Kindle Create, select Novels, Essays, Poetry, Narrative Non-fiction. (Unless, of course, your book is one of the others, in which case this guide isn’t for you).

Choose the file. Upload the manuscript. It asked if we wanted to do a bunch of stuff, which was obviously yes.

Awesome. KC found all our headings and created a TOC! It doesn’t appear to be inserted in the text though, unlike the Word document.


Hmmm with these clickable format buttons, we’re able to define a copyright page, splitting it off from the Title Page. Looks alright…

We didn’t format mid-chapter separators in the Word file but Kindle Create has a standard separator format. If you missed any chapter titles or quotes in your Word Document, you can use this to define them too. Nice.


Ooh, Drop Caps. It looks like A Still, Small Voice might feature drop caps just because of this function. Ha. We didn’t test the “poetry” function because this ebook doesn’t have any.


Autosave reminders. Good job.


This pic was already in the word format and this is how it appears when converted over.


We tried reuploaded this picture to see how it works. KC only accepts pics in jpg.


KC has a handy previewer, so you can see what it actually looks like on a (mock) Kindle.


Oooooo themes! Not really necessary, but fun. Also, this is where you get a prettier ebook than just formatting in Word, I guess.


When you click publish, Kindle Create saves a separate file (.kpf) to upload on the site, same as if you upload the Word doc.

Verdict: Not really necessary, but it’s easy enough to use. And kinda pretty.


So does that mean I have a formatted ebook for Amazon now?

If you followed the Microsoft Word steps, you’ll have a formatted Word Document (.docx) that you can upload to Amazon.

If you used Kindle Create, you’ll have a KC file (.kpf) that you can upload to Amazon.

Head back to Step 10 of the Publishing on Amazon: Step-by-Step Guide to see how to upload it.


One thing to note: if you create your ebook via Kindle Create, you will not be able to download a preview file that you can send to reviewers. All you’ll have is the .kpf file that can only be read on Kindle Previewer.  However, if you use a Word Doc or an epub to upload to Amazon, you’ll be able to get a .mobi file to review that you can send to reviewers.

Publishing on Smashwords: Meatgrinder and other functions

In our second instalment on publishing on Smashwords, let’s get to through the icky stuff first: The Meatgrinder. Smashwords has a free style guide you can download here, where founder Mark Coker gives you several ways to format your book, but by far the easiest and the most effective way is what he calls the Nuclear Method.

Meatgrinder and other Smashwords functions

Here are the quick steps to formatting for Meatgrinder:

  1. Copy all your text and paste into notepad.
  2. Open a new Word document.
  3. Cut everything from notepad and paste into the new word doc. This ensures that there’s no weird formatting left over from whatever Word did in your last document.
  4. Highlight all your text and add in your first paragraph indent. DO NOT TAB FOR THE LOVE OF GOD. If you’re not sure what that means, it should look like that bit circled in Word.Indenting a paragraph
  5. Go through your text and
    • add all your italics/bold/underline (if any) back into the text. This extra step, while annoying, also helps you proofread your book one last time. And because you’re not focusing on the words per se, it helps you pick out random typos that you’ve probably glossed over because you’ve read it too many times.
    • Add in page breaks after each chapter.
  6. Format your chapter titles and save them as bookmarks.
  7. Add in your front matter. We have a standard template front matter that we just paste in and change details.
  8. Create your table of contents (“TOC”). This is the most annoying part because, to make sure it works right, you have to do a manual one. DO NOT ON ANY ACCOUNT USE WORD’S AUTO TOC. You’re just giving yourself more trouble. What you do is list down all your chapter titles. Remember the bookmarks you saved in #6? Yeah, now you link those bookmarks here.Sample Table of Contents and bookmarks
  9. Add your end matter. Again, create a standard template that you can paste in and change details. This usually includes other books you’ve written, an about you, and a nice “please review” request!

So this means I won’t get any Meatgrinder errors?

The most frequent cause of errors, by far, is caused by hyperlinks, because Word likes to add them in randomly. We know. It has caused us pain many many many times.

This is what it looks like:

Random hidden bookmarks

These bookmarks tend to pop up like ghosts. Like you could look at it in one version and it appears to be clean, but if you deselect and then select hidden bookmarks, they suddenly jump out at you. You just have to patiently delete them one by one, because there is no “delete all button.”

What you want is a clean file like the picture below, or the one under #8, which only shows the bookmarks you’ve created and which are linked to your TOC.

Clean bookmarks look like this

The second most frequent culprit in Meatgrinder errors is your line spacing. If you cut and paste your text to a new Word doc, this usually won’t cause any troubles. But just to be sure, your line spacing should show “0” or “Single” everywhere otherwise your epub might have some weird spacing issues.

Clean spacing

Still too difficult? We’re more than happy to format this for you!

Okay, now that’s out of the way, let’s head to the cool stuff about Smashwords!

Global Pricing

If you’re worried about how fluctuations in USD will affect the price of your book, Smashwords gives you a global price lock to fix the prices in foreign currency.

Global pricing for Smashwords

Just go to “global pricing” on your dashboard, and then “Add lock”.

Series Manager

Got a series? No worries. Match them all here. Way better than having to email back and forth with Amazon to get it done.


Premium Distribution

One of the things that Smashwords has going for it is that it is both a retailer AND a distributor/aggregator. If you want to check (or control) where your book is being sold, head to the channel manager.

Once you’re approved for the Premium Catalog, you can head over to the Channel Manager to decide where you want Smashwords to distribute your ebook to.

We usually just opt out of shipping to Amazon because there are some weird conditions as to when Smashwords will actually be able to distribute to them (after a thousand copies sold or something?). It’s also easier to just upload directly on Amazon, especially with Kindle Create.

Coupons!

This is by far the one feature we wish every other platform would also offer. Want to give someone a discount? Or have a sale specifically for a small group of people? Smashwords lets you create discount coupon codes that you can limit or privately distribute instead of having a store-wide sale for the whole world.


What’s your experience with Smashwords been like?

Did you have a terrible time? Do you love the platform? Do you have any tips or queries? Let us know!

Creating an EPUB via Scrivener

One of the downsides of publishing on E-Sentral and Google Play is the fact that you have to create and upload your own epub file. Other platforms, including Amazon and Smashwords, allow you to upload a Word file (.doc or .docx) and does the conversion for you.

What’s an epub?

EPUB is an e-book file format which is used on most platforms, including smartphones, tablets, computers and e-readers. It’s HTML based so even if you don’t have a specific e-reader on your computer, you should be able to open it in most browsers.

How do I create an epub?

We don’t know the specifics of how exactly you’d code an epub, but here’s the easy version using Scrivener.

Organise your chapters into folders.

Create Folders

Organising your chapters into folders will tell Scrivener where your actual chapter breaks are. In the screenshot, you’ll see that sometimes we put in several text files into the same folder. These are in-chapter breaks.

Update your front matter files.

This includes adding your cover picture (which can be done by dragging the picture file into the folder, creating a title page (as above) and a copyright page (per below).


Add your back matter.

add back matter

We usually add this to the end of the Manuscript itself, as there aren’t any pre-formatted folders for Back Matter. Back matter, as said previously, would include information about your other works or how to contact you via email or social media.


Compile your file.

Under “File”, you’ll find the compile function. There are several steps to this:

a) Select e-book format (with or without parts). This will tell Scrivener that you want to create an epub.

b) Select the cover file you previously added to the front matter folder.

c) Update your metadata.

d) Click compile!


Check your final files.

Now that everything is done, open your brand-new epub file to test that everything looks like it’s supposed to. You can also run it through this checker to make sure there are no errors.

And you have an epub file to upload to E-Sentral and Google Play!


If you have problems creating an epub file, or you don’t own a copy of Scrivener, check out our publishing hub. We’ll be able to create an epub file for you for as low as RM120.

How much does it cost to self-publish?

how much does it cost to self-publish?

Now that we’ve covered how long it takes to self-publish a book, how much does it actually cost?

Let’s take a look at the costs, based on the process that we’ve covered so far:

1. Writing

Unless you’re paying someone to ghostwrite for you, you shouldn’t have any expenditure here. Well, maybe about RM100 or so for paper, pens, and printer ink. But if you want to be that nit-picky, you can count the cost of electricity, internet, food, water, etc.

Expected cost: NIL

2. Editing

Editing costs depend on the type and level of editing required. Here are the various types of editing, in suggested sequence:

Developmental editing

This looks at the overall big picture of your novel. How strong is your plot? Is there a plot hole big enough to drive a car through? Is there enough tension? Are there any slow, boring parts? Does your story make sense? Is backstory a problem (either too much or too little)? How can we improve and polish this story until it’s not just ‘good’, but ‘exceptional’? It’s pretty hard to find developmental editing here in Malaysia, but the numbers we’re seeing online estimate anything from USD1,000–USD6,000.

What we do have in place of this, are writing mentors, foremost of which is Gina Yap Lai Yoong. Hang about the Malaysian Writers Community and/or Twitter to see when some of our writers are looking to pick up new mentees! Most of these come at no cost to you, other than putting in the hard work and probably belanja-ing your mentor to dinner once in a while. An alternative is to find a critique group or beta readers that have great story sense that you can trust to give you honest feedback.

Line editing

A line editor goes into the nitty-gritty of the manuscript, focusing their red pen on everything from specific words, to sentences, to paragraphs, to chapters. They look at strengthening your work in terms of style, flow, structure, and readability, besides the usual correction for spelling, grammar, punctuation, and other basic/common language mistakes. Do your sentences flow well? Is your POV consistent? Do you flop between tenses? They may also help pick up obvious continuity issues—do you say A in Chapter 1 but then change it to B in Chapter 8?—though they won’t be going into the plot development itself. Line editing for a 50,000-word novel would range between RM3,000 to RM5,000 here at Teaspoon Publishing.

Proofreading

This is your final line of defence! At this stage, you’re pretty much just catching typos, concentrating on spelling, grammar, and punctuation, as well as other basic/common language mistakes. Proofreading for a 50,000-word novel ranges from RM2,000 to RM4,000 here at Teaspoon Publishing.

Some people tend to skimp on editing and jump right into just a quick proofread or do nothing at all. This isn’t really advisable, even if you’re an editor yourself, because it’s hard to find your own mistakes. It’s also really, really hard to tell if there are continuity issues or if things are confusing in your own manuscript because you know everything in your head. However, what’s in your head may not have all made it out onto the page in a way that others can understand.

If you’re really cheapskate (or you have really good friends), one way to save on this is to do a barter trade with your writer/editor friends, like I’ll edit your manuscript if you’ll edit mine. The results may not be really the best unless both of you are professional editors.

Expected cost: RM2,000 – RM5,000

3. Cover Design

A premade cover sourced online could cost about USD40 – USD80. An original cover could cost between USD100 – USD500, or more. We’ve paid between RM400 – RM750 for our covers. We recommend looking up Charis Loke Illustration and Magpie Designs!

Expected cost: RM150 – RM750

4. Formatting

Frankly, it’s not that difficult to format your own books—but it IS time-consuming, time that could be better spent writing your new book or doing marketing (ha). At Teaspoon Publishing, formatting generally costs RM60 per ebook format and RM100 for print layout (text only).

Expected cost: RM60 – RM280

5. Publishing

a) Online/ebook

The various platforms/distributors mostly take a cut of sales, generally between 30% – 50%. At the $0.99 – $2.98 price point on Amazon, they take a cut of 65% (I.e. you get 35% royalties on sales).

Expected cost: NIL.

b) Print

Printing costs depend on bulk. If you’re only printing 100 – 200 copies, you might want to check out these print-on-demand (POD) and/or book printing services:

Please note that we have not dealt with these services personally, but they have been referred to us or recommended on forums.
The higher quantity you print, the cheaper it is per copy.

OR, you can skip doing a local print run altogether and do POD with Lulu / CreateSpace / Ingram Spark. With this service, readers around the world can buy a physical copy of your book and have it shipped directly to their doorstep. You won’t have to pay anything upfront – the printing cost is taken out of the sales price & royalty paid to you. You can also print small batches of your book at their author price (cost of book + small markup for the printer)—but shipping from overseas is often the expensive bit.

Expected cost: ???

6. Distribution (for print)

This doesn’t appear in the timeline for self-publishing, but it’s a cost that you might want to consider if you want wider distribution if you decide to print your book. Most independent bookstores will ask you for a 30% – 40% “discount” on your retail price. This means that for every book you sell at RM20, they’ll pay you RM14 (30% discount) or RM12 (40% discount). This is how bookshops make their profits.

However, getting into chain bookstores (MPH, Popular, Times, Kinokuniya, Borders) normally needs you to have a distributor/agent. The only options we’ve come across so far are Inspiration Hub (30% royalty) and GerakBudaya (approx 55% discount). You’ll have to decide for yourself if this is cost you’re ready and willing to bear.

Expected cost: ???

Total costs of self-publishing

All in all, self-publishing an ebook may cost you between RM2,200 – RM6,000—and that’s not even including print! Yet 90% of this cost is from that one step you really shouldn’t skip: editing.


At Teaspoon Publishing, we believe in empowering authors to take control of their career. If you need a boost on your journey, check out our Publishing Hub to see how we can help!

How long does it take to self-publish a book?

How Long Does it take to self-publish?One common question we’ve received is how long does it take to self-publish a book? This is usually tied to another question—what’s the process of self-publishing a book?

Here’s a very rough guide to the process of self-publishing a book, including the estimated time each stage would take.

1. Writing

Some writers can finish writing a novel in a month, some take months, even years. To make a meaningful estimate of the length of time it takes to self-publish a book, we won’t include the initial writing phase of the book in this estimate, assuming that the process we’re looking at will start at the point where the manuscript is finished and ready to be sent for editing.

2. Editing

Depending on the wordcount and the editor’s schedule, a full edit can take anything from a week to a month, maybe more. A good estimate for a 50,000-word book would probably be one to two weeks for the initial edit. After that, it would be wise to budget a week for writer’s meltdown and wallowing in self-pity, another two weeks for rewrites, clarifications, arguments over what to change and whether to change them, and maybe a fourth week for finalisation of the manuscript.

Best estimate: one month.

3. Cover design

Cover design can be done concurrent with editing, assuming you’re pretty sure you aren’t going to rewrite the whole book or give up on the project altogether. It also assumes that you’ve already decided on your title.
This stage really depends on your artist so this is something you’ll need to discuss with them. You could get a premade cover online which would probably be updated in three days OR you could get an artist to conceptualise something specific for you, which could take anything from one week to three months. Remember: the more customised and the more handmade/hand-drawn it is, the more time it will take.

Best estimate: one month, possibly concurrent to editing.

4. Formatting

Layout and formatting for a text-only book should only take two to three days per format. A manuscript with pictures, graphs, or diagrams would take longer to format.

Best estimate: three days.

5. Publishing

a) Online/ebook 

Publishing online will only take a few hours of your time, assuming you have all the required materials ready (price, categories, back cover description, cover, formatted manuscript, ISBN, etc). Do also budget some time to review the converted file to make sure it’s up to standard before publishing. This is the best time to catch overlooked errors, typos, or formatting glitches, which would need a quick fix.

Best estimate: one to two days.

b) Print

Budget in at least two to three weeks for the printing process as the printer you send it to would have to review the files and get everything in order before starting the print run. If they need to send the files back to you for revisions, that would extend the time as well.
Best estimate: three days.

Total time: two-and-a-half to three months.

Do remember the time estimates noted here would vary for each writer and each contributor at every stage, and some stages may cycle back and forth several times. This estimate is also created assuming that the publishing of this novel is the sole priority of every contributor. This isn’t the case in the real world. Sending your novel to an editor doesn’t mean that they will be able to work on it right away. They may have other jobs they are currently working on that needs to be completed prior to yours, or they could be juggling multiple projects at the same time. The same goes for all the other stages, unless you’ve already booked their time in advance.

All in all, really proficient self-published writers can publish a new book every 3 months whilst traditional publishing generally takes 2 years from acceptance of the manuscript to final print. Our advice is to not rush the process as rushing may lead to sloppiness and more errors in your final book. You want a product that you can be proud of—and that takes time.


At Teaspoon Publishing, we believe in empowering authors to take control of their career. If you need a boost on your journey, check out our Publishing Hub to see how we can help!