
What is Draft2Digital, or D2D?
As we mentioned in this post, D2D is an aggregator—or what you might call an e-book distributor. It serves as a central hub where you upload your ebook and then that ebook gets sent out to a bunch of e-book retailers. In this case, D2D can help you get your books on Amazon, Barnes & Noble, Kobo, and Apple, plus library and subscription services such as OverDrive and Scribd.
Draft2Digital acquired Smashwords recently so everything is going to be streamlined in the near future. We don’t know all the details of how the accounts (if you have accounts on both) are going to merge, but it’s something we’re keeping an eye on for new developments.
While we’re waiting for that, here’s a quick step-by-step guide on how to publish your lovely new ebook on D2D and have it EVERYWHERE ONLINE!
But first…
Draft2Digital Formatting tips
One of the reasons we’ve prefered D2D over Smashwords is because formatting your ebook is so much easier (and prettier) using their inbuilt templates and automation. It’s almost 90% less work than formatting for meatgrinder on Smashwords. But as usual, you still need to keep some minor formatting rules in place to get it to do what you want. Here are the basics.
- Make sure all your chapter titles are formatted the same way. As long as it’s consistent (for example, all titles are in bold & capslock or something like that or using Header styles), Draft2Digital will assume that’s the chapter title. You don’t have to manually insert a Contents page.
- If you use scene breaks, you’ll want to leave 3 blank lines, something like this:
 Draft2Digital will convert this into a scene break. Depending on the template, it’ll have a pretty little icon there (which changes based on the theme you select), something like this:
- Insert a page break at the end of your chapter; though this usually isn’t very important. If you leave a bunch of empty lines (i.e. more than three lines) followed by a chapter title, Draft2Digital will convert that into a page break anyway.
- Copyright page: Draft2Digital has a standard copyright page which is really barebones, so you can leave that off your document and let D2D do its thing. However, if you want to control what the copyright page says, add one at the beginning of your manuscript.
- End matter: These can be auto-added by Draft2Digital once you fill up your profile. However, if you have other books that are not published via Draft2Digital, you’ll need to manually add book pages to the end of your manuscript.
But okay, enough about formatting.
Here’s how you upload your manuscript to Draft2Digital
Right on your dashboard, click the big red button that says:

Ebook setup: cover & metadata

Pretty self-explanatory. If you have your ebook cover ready, put it here. If you don’t yet, leave it blank. You can upload it later. But if you’re planning to publish like now, now, then you NEED to have this ready.
Then you have to fill in a bunch of basic info. If you’ve uploaded books on Amazon, Smashwords, e-Sentral or Google Play before, this is basically all the same info.

If you’re at this stage of publishing, you should already know your book title and what language you’re writing in. Though, titles are tricky.
For this one, it’s part of the Absolution Series, so we’ve put that under “Series” and we have Volume Number 1.5.
Okay, 1.5 is a weird number, but this book kind of sits in a timeline between the main two books of the series, but isn’t actually part of the overarching plot of the duology. Hence, 1.5 because it’s a sidetrack.
If your book is a stand-alone, you can leave both of these fields blank.
“Prioritized search terms” is how you want people to find your book. So since Hostage Prince is a fantasy story set in Southeast Asia, we’ve put that in for now, while we figure out what else works. Put your most important search terms at the top because if the vendor/retailer has a limited amount of search terms, they’ll only take the top few.
ETA: Don’t forget to press enter after keying in your search terms in the box! You can do that after each individual term, or you can do that after you key in a bunch of terms separated by either a comma or a semi-colon. This sends what you’ve entered into the Prioritized Search Terms box and then you can drag and drop them in the sequence you prefer.

“BISACS” (Book Industry Standards and Communications) is where they are going to try to categorise your books, something like deciding which specific niche genre it’s in. Amok was placed under Young Adult/Fantasy and Absolution will definitely fall under that too, but Hostage Prince is slightly above YA because Yosua is 20 at the start of this book, and it’s not quite coming-of-age. It’s more Yosua’s pining, faith story with lots of murder and blood, so we’re going to try sticking this in Fiction/Fantasy/Action & Adventure (you can’t have Fiction & YA Fiction at the same time) and maybe see if it’ll cross over into the Christian/Fantasy lists.
You can choose up to 5 but the top two are the most important.
Then you click

Ebook Details
This is where you upload your manuscript in doc, docx, rtf, or epub format to Draft2Digital.
If you already have a nice epub you really want to use, and you don’t want to utilise Draft2Digital’s autogenerated front and back matter, then just upload the epub.
If you intend to use their autogenerated stuff, stick with the Word document.

The page is currently reminding us that we have not yet uploaded a cover. Clicking on the “Edit shared metadata and cover” link is where you can go back and make changes to everything that appeared on the ebook setup page. If you’re setting up a pre-order, enter your targetted pre-order date. If you’re publishing now, well, just choose today.

“Ebook Description” is basically your back cover copy of the print book (if you have one), or what appears on the sales page on, say Amazon. It tells people what your book is about.

The next two sections are optional but are great if your book is a collaboration, or you want to credit a lot of different people who have worked on your book.
If, for example, you are co-authoring a book with someone else, Draft2Digital lets you split your royalties.
You can also credit other people on the book, like your cover designer!
E-ISBN
Draft2Digital requires an e-ISBN, but since we uploaded this while on preorder and had not yet applied for an ISBN, we just added a placeholder number first.
WARNING!!!! If you do this, make sure you remember to update this to your ACTUAL e-ISBN BEFORE you authorise your ebook for publication! Once it’s published, you can’t change this anymore. Then if errors appear, you’re going to have to unpublish and delete the whole ebook and start the publishing process again.
There’s an option to use free Draft2Digital-provided e-ISBNs (so you don’t have to apply for your own), but we disabled this on our account since we apply for all our e-ISBNS anyway. (Yay free e-ISBN from PNM!)
Okay, so done?

Ebook Layout
Here’s where we get to the fancy stuff!
Remember we said you don’t need to insert a manual Table of Contents?
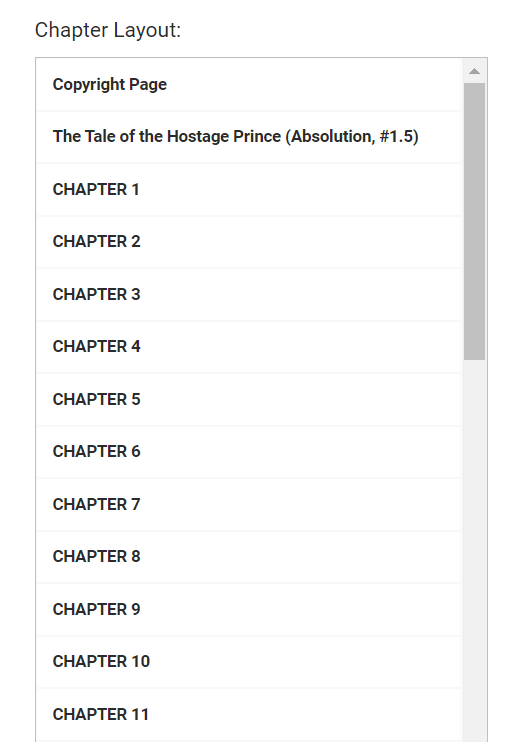
Yup, Draft2Digital generates one for you based on your document headers. If something doesn’t look right, click on

This will take you to an “Improper Chapter Detection” page, where you can select which formatting in your manuscript denotes a chapter title.

If that’s too much trouble—or you realised that you never really set any headers for your chapter titles, just go back and make all your chapter titles consistent then reupload the manuscript. Just using Word’s generic header styles will work fine.
Once your chapter titles have been fixed, you can add start adding all the extra front and back matter.
Front Matter

We’re adding a title page because we didn’t include one in the manuscript. We already have copyright & dedication pages included in the manuscript, so we don’t need to select those.
Back Matter

If you’ve already published other ebooks through Draft2Digital, you can add them to your book (options are beginning/end/both) so that readers can see what else you’ve written and click on the links to buy them.
There’s also a new release signup, kind of like a “follow author” option, so that the next time you release a book in Draft2Digital, they’ll get an email about it.
The Teaser option will put a brief blurb about your other books at the end of your ebook. We’re guessing that people who read Hostage Prince would probably have read Amok, but you never know! Sometimes people read out of order, since this isn’t a strict sequel anyways, so this includes a short preview of Amok.

Biographical Pages is where you add your profile and your company’s profile (if you have one). This info is set up when you create your account (under Account Settings) so we’ll probably stick that bit in another post.
Now,

Preview time!

Draft2Digital lets you preview the converted ebook directly on the web, but the viewer can sometimes be a little wonky. We usually like to download the mobi & epub copies to have a closer look.
But before you do that, choose your template style!
We previously used Science Fiction & Fantasy > Regal for Amok, but we’re going with All Purpose > Maraschino for this one.

You can also set if you want to start your chapters and scenes (after a scene break) with Drop Cap (the first letter is really huge), Phrase Cap (the first line is in capitals), or None (no fancy stuff needed).
Okay, so now you can download the stuff and go review your ebook!

Basically, at this point, you can keep revising stuff until you’re happy with how the book looks. Reviewing and revising might take a while, but don’t worry. It’s all saved in the system and you can always come back to look for your draft on your dashboard:

Release the Kraken!
Right, you’ve reviewed it a million times, updated for typos, found the best theme/style, updated your cover, screamed at your cover, changed the theme again, updated your metadata, updated your eISBN…and now you’re ready to publish!
Remember that this is your last chance to put in the right eISBN (if you’re stupid enough to use a placeholder like us). Because if it’s wrong, you have to delete this whole thing and start again.

Alright!
So once you’ve approved your book for release, you get to the publishing page where you get to pick your price and where you want to sell your ebooks.
Ebook Publish
Here’s where you put in your retail price and select where you want your book to be sold. You’ll want to put the full price here because sales or promotional prices can be set on another page.


We don’t select Amazon distribution via Draft2Digital because we DO have a KDP account where we upload our ebooks directly. Selecting it here plus uploading there would create a conflict and might get not just the ebooks pulled from Amazon but the account closed/banned as well. If you don’t have a KDP account and have no intention of opening a new one, select this so that your ebook is distributed to Amazon. There will be a bunch of things to confirm before they actually distribute to Amazon, though.
Library pricing
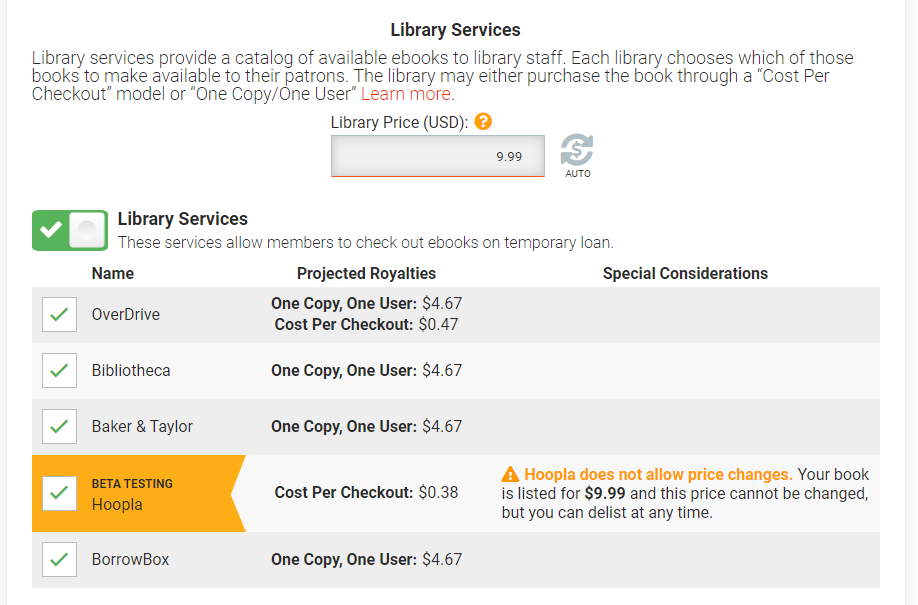
The pricing for this is a little confusing, so we usually just use the “auto” price so that Draft2Digital selects the best price based on our selling price.
Then you get to click publish!
Phew! (Break time)
Your book page

This book page is where you’ll be able to update or edit things later on. It’s also where you can add a print book (we’re currently using IngramSpark and Amazon KDP’s POD) or an audiobook.

The Draft2Digital Print Beta runs on a waiting list so you may not be able to use it right away.
What if I wanna run a sale?
Well, that’s where the handy “promotion” button comes in! We used this to set up our pre-order price.

This page tells you your current price and the expected royalties you’ll get at that price. You can set a promotional/sales price to run on certain dates and they’ll tell you how much royalties you’ll get from sales at that promo price. You can also set promotions to run only in specific territories if you’re targeting some kind of country-specific celebration.
Aaaaanddd that’s pretty much everything you need to know about uploading a book on Draft2Digital for now.



 Draft2Digital will convert this into a scene break. Depending on the template, it’ll have a pretty little icon there (which changes based on the theme you select), something like this:





 Smashwords was launched in 2008, and whilst it isn’t quite as big as Amazon or the “


 One of the downsides of publishing on E-Sentral and Google Play is the fact that you have to create and upload your own epub file. Other platforms, including Amazon and Smashwords, allow you to upload a Word file (.doc or .docx) and does the conversion for you.


